It has been a long time since I installed Byrd Tool’s Shelix carbide cutter heads in my Delta DJ-20 8″ jointer (May 2009) and DeWalt DW735 13″ planer (June 2012). The videos showing the installation of the cutter head in my planer have been viewed almost 75,000 times!
Although the machines still produced tearout-free cuts, they did leave ridges behind and I suspected that changing to fresh edges would lower the noise level and reduce the strain on the motors. I had not rotated the cutters until now.
Byrd Shelix Cutter Head Basics
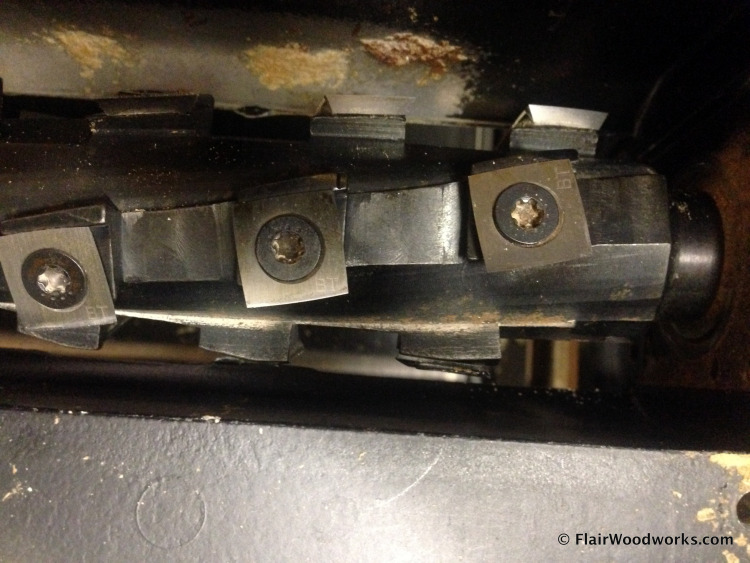
The machined cutter head had tapped holes to received machine screws, each of which locked down one squarish carbide cutter. A registration ledge machined into the head automatically aligned the cutters, so “sharpening” the head was as simple as loosening the screws, rotating the cutters 90 degrees, and retightening the screws.
Each cutter was marked in the corner, and all were positioned the same way out of the factory so it was easy to tell which cutters I had rotated.

Rotating the Cutters
The screws securing the cutters on my thickness planer required almost as much force to loosen as I could apply with the screwdriver and Torx bit supplied by Bird. A few were looser than others, so were easy to remove.

When I rotated the cutters of my jointer, and I found that the machine screws there were considerably tighter. I was able to loosen some using all of my strength on the screwdriver, but resorted to using a Torx bit on the end of a 1/4″ ratchet to break them loose. It was nice to have two Torx driver bits available (one came with each cutter head) so that I could have one on each tool to expedite the process.

In order to rotate each cutter, I found that all I needed to do was back off the screw three revolutions. In a couple of instances, I found that a bit of debris got lodged between the cutter and the registration ledge, so I actually needed to remove the screw and clean the cutter.
One of the great features of this type of cutter head was that the cutters are self-indexing, which eliminates the tedious task of setting cutter heights with measuring tools. However, the cutters did need to be reasonably close to their final positioning to self-align. If not close enough, the cutter got hung up on the registration ledge and the screw wasn’t able to pull it into place. Continuing to tighten the screw could have broken the fragile carbide cutter.
Once I saw the cutter drop into place, I tightened the screw as tight as my grip on the screwdriver allowed. Then it was onto the next cutter. I rotated the cutters one row at a time.
It took 16 minutes to rotate the 40 cutters of my 13″ planer (4 rows of 10), and 20 minutes to rotate the 40 cutters of my 8″ jointer (5 rows of 8).
![]()
SOURCE: Flair Woodworks – Read entire story here.


