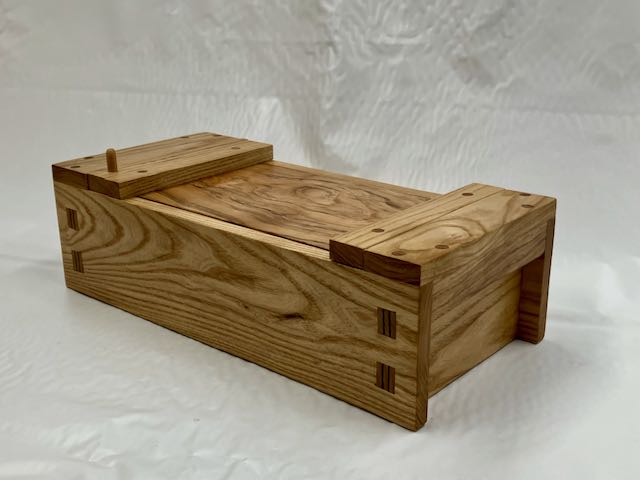
I’ve been seeing these boxes on Pinterest, Instagram, and other places on the net so decided to make a pair of them for my grandsons Christmas present this year. They both are collectors of “things” so think they will like Opa’s interpretations of them for their “treasure chests”! I mail ordered some Ash from Woodworkers Source and they sent some beautiful pieces, one especially will be destined for the lids. With this blog I’ll break down the process to not only illustrate it for anyone else that may build one of these but also to remind me in case I make another! I hope that Connor and Rory will look at this and possibly be inspired to explore this world of woodworking that their Opa loves so much.
Mortises:
Working with the Ash has been an experience, it is very hard and the grain structure also makes it difficult to scribe clean, crisp lines to work to. Mike Pekovich from Fine Woodworking Magazine has a video series where he uses tape along with marking gauges and spacer blocks to accomplish this. You may need to be a member of the magazine to access it. For my project I could only mark the outside of the boards because the inside has a dado cut to accept the side pieces, this meant I really needed to be accurate on the layout and his technique really worked great, the Ash — well that’s a different story!
Tenons:
If the mortises had cut cleanly each on them should have been exactly the same size, however; not being able to obtain clean cuts meant that they were slightly different so couldn’t use all of the techniques Mike Pekovich showed in his project.
Sliding Tray:
To add versatility each box will have a sliding tray made from 1/4″ thick Beech left over from another project. They’re about two thirds the length of the box and 1 3/4″ deep. No pictures but simple mitered construction using packing tape for assembly. The plywood bottom sits in a dado and the bottom of the box is covered with a heavy fabric on mat-board.
Lid, Battens, and Wedge:
There’s not a lot of exact information that I could find about the battens and the wedge. I’ve read that traditionally the boxes didn’t have a locking wedge. Tradition also has them assembled with nails and the bottom is nailed on. I chose to set the bottom in a dado and also join the battens with glue, screws, and plugs. Some show the wedge without an angled cut but I choose angling it make it more secure. Since these are going to a much more humid location than Las Vegas left a good 1/16″ gap between the lid and the sides of the box. The first step was creating the pieces for the top of the box and lid battens.
Fitting the lid required some experimentation. One end of it has a fixed batten that I located 1/4″ from one end. A spot of glue at the center and screws at each end secured that. I used a piece of plywood to fine tune the length of the lid and I’d recommend doing that if you make one of these. Much easier to screw up a scrap of plywood than a beautifully figured piece of Ash! Basically, after that first batten is attached you insert the lid and slide it so that it’s against the box piece. Then place the other lid batten and wedge in position, draw a line to locate it. A trick I saw and used was to put blocks inside of the box that held the lid at the right height. Now I was able to drill the pilot holes for the screws directly into the lid and attach it in place.
Final Steps:
One change I made was to drill a 3/8″ hole in the locking wedge piece and then glued in a short dowel. These boxes will probably not be stacked and with the higher humidity that wedge could become difficult to remove. I don’t want them tapping it with a hammer! My finish of choice is Osmo #3043, two coats applied with nylon scotch pads. This was a good, challenging process; here’s a slide show of the finished Japanese Toolboxes.


