For almost the entire month of July and now well into August the weather for my location has been telling us we’re under an Excessive Heat Warning. Don’t get me wrong, I love living in the desert but this is getting to me!! My shop isn’t air conditioned and it’s not a possibility anyway but by lunch time temperatures are in the low 100’s and I’ve recorded a high of 118° many afternoons. Coolest is usually in high 80’s/low 90’s. I can tolerate the heat for the most part but am unable to do any finishing or gilding. Glue-ups can be done in the house but finishing creates too many fumes so I’m at a standstill for to complete two frames currently ready for finishing. One of them is this one with twisted feathers carved in the corners and I’m anxious to see how it will look when finished. Click on the link for a brief YouTube video of it.
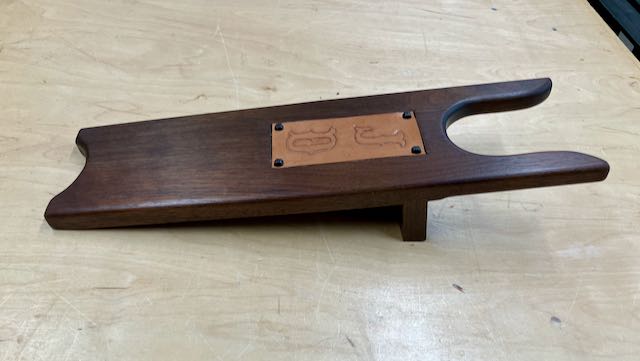
In the meantime, I’ve tackled a few projects to keep myself in the shop and off of the couch! A friend approached me and said he needed a boot jack and wondered if I’d be able to help him out on that. Never one to turn down any project/challenge I told him sure and proceeded to educate myself on them. The internet is full of information (not all valid unfortunately) so you need some discernment. They’re basically a board with either a rounded or V-shaped hole at one end which is elevated a couple of inches to allow your boot to slip in and then pull your foot out of it. Here’s what I came up with:


I had some Peruvian Walnut (aka Tropical Walnut) which I thought would be a good choice for this project. If you follow my blogs you know I’ve recently been experimenting with leather so decided it would be a nice touch to add a monogram. I was able to copy/paste and then resize an alphabet from free internet sources and transfer that to a piece of 3/16″ vegetable tanned leather. For that authentic western look I had some small clavos which were nailed in each corner. The piece that elevates the boot jack is inserted into a dado then glued, screwed, and plugged. Although this wood is great to use hand tools on it can get splintery, especially when it’s in a hot shop in a dry climate; almost like a kiln! I could have used a router to cut out the inlay but prefer the quietness and process of using hand tools. Here’s a photo montage of that process:


Once the perimeter was chiseled to depth I used a bench chisel to take out the center area, leaving it somewhat pillowed. When the depth was close to what it should be my antique Stanley 71 took care of getting the bottom flat and uniform to the required depth. That area was taped off and 3 coats of OSMO 3043 were applied. Once dry, the leather was installed with contact cement and the clavos. I enjoyed the look on my friends face and his appreciation when I gave him his boot jack — that’s what it’s all about

The other project I completed was this display board for Diane’s studio where she can put her in progress paintings. She tends to work on more than one painting at a time and would place them on the floor between sessions. There is a limited amount of wall space and it’s also possible to kick them accidently. It’s also difficult for her to really see her work as a potential buyer would too. The board was made from a 5’x5′ piece of 3/4″, pre-finished Baltic Birch. It’s located on a wall a good distance from her easel so she can study it at a distance. She’s mentioned a few times already how having it at this height and on a neutral background really helps her study her work. Many times I’ve seen her take a painting from our wall that’s already been framed to make some minor changes to that she hadn’t noticed at the easel.
Making this was fairly straight forward and as you may know Baltic Birch plywood is heavy! The first step was to layout and drill the holes for 1″ dowels. We decided on 6″ centers and 3″ from the edges. This worked out evenly for the 60″ dimension. I made a template from some MDF and drilled small holes in it to locate the center of each of the 100 holes. My first choice was to use a forstner bit since they make the most accurate holes, however; Baltic birch plywood is so dense and has lots of adhesive the bit I used was toast after about 4 holes! Next up I tried an auger style bit but it too had a difficult time even starting. Final resort was a spade bit that had a spur on each edge, this worked well as long as I kept the speed of the drill slow, matter of fact I used the screw setting on my Makita. To prevent blow out the plywood was placed on the cheapest piece of 1×4 I could find and this worked well. To finish off the holes I used a router to cut a slight chamfer in each one and also added that chamfer to the outside edge.
Next up was installation. I’ve always been a fan of French Cleats and saw that the largest internet retailer had 30″ aluminum ones. Great, or so I thought until I got them. Very flimsy and worst of all it came with flat head screws but the holes weren’t countersunk so when you attempt to slide them together the head of the screw stick out and prevents the cleat from seating!! Glad they have an easy return policy and proceeded to make my own cleat from a piece of Poplar. Actually was a blessing in disguise because the stud spacing on that wall isn’t the standard 16″ on center. Here’s some pictures to illustrate the process, click on them to see the entire photo.


