I got a Land Cruiser last year, partially because of the great cargo area in it (with the back seats removed). Since I got it, I’ve been wanting to build some sort of storage to hide and store tools as well as the typical gear you should keep around (first aid kit, roadside assistance kit, straps, jumper cables, etc.) I finally got around to it, and it’s already a lot more useful than I expected!
Recently I did an install for a desk and had to take several tools with me in the back of the truck. After the install was complete, I was hungry for a local burger place. Unfortunately, I didn’t feel comfortable leaving my truck unattended with a bunch of tools and camera gear exposed by the back windows. That was kind of the final push I needed to start building a tool/storage box that could organize and also hide my stuff.
It’s a very simple build that could easily be modified to fit into most any vehicle. It could also be broken up into more or fewer compartments/drawers.
Check it out!
Tools List:
(purchasing via these affiliate links supports ILTMS)
Woodworking:
- Rubber mat (for top)
- Rubber mat (for inside)
- Drawer pulls (2)
- Piano Hinge (30″)
- 18″ Drawer slides (2)
- SawStop cabinet saw
- Skil circular saw
- Dewalt 20v drill driver combo
- Dewalt compound miter saw
- Orbital Sander
- Pancake compressor/nail gun combo
- 54″ Drywall T-Square
- Jigsaw (This one is much better than the one I have)
- Kreg Rip Cut (circular saw guide)
- Shop Fox Hanging Air Filter
- 2HP Dust Collector with 1 Micron bag
- Speed square
- Fiskars cutting mat
In the back area of my Land Cruiser, I took conservative measurements. I wanted to be absolutely sure that it fit.

I transferred the measurements to a sheet of 1/2″ plywood for the base.

Initially I drew out “wings” for each side to fit the area behind the wheel wells. I eventually cut these off because I changed my mind about including them in the main structure. I cut the base out with a circ saw.

I ripped some 3/4″ plywood down to act as the outer walls of the toolbox.

I predrilled and screwed through the back panel into the side panels. I added glue to these joints before the screws.

I cut and added (with glue) one more panel as a cross divider.

I used a speed square to hold this piece perpendicular to the outer wall while screwing it in.

I also added a short section to the center of the cross divider. This also got glued and screwed into place.

I added a bead of glue to the top edge of the whole assembly and laid on the plywood base.

I screwed the base into all of the upright pieces which locked it together well.

These screws were also countersunk, since this will eventually be the bottom face and they need to be flush.

I screwed in 18″ drawer slides to both of the drawer areas.

These sat flush with the bottom panel and the front, outer edge.

Using more 1/2″ plywood, I cut down eight pieces to make two drawers.

I ran each piece over the lowered blade to cut a small dado. I moved the fence over slightly and ran them all through again to make the dado a little wider.

The dado needed to be wide enough to accept some 1/8″ plywood. I cut two pieces of it to the drawer bottom size.

The drawers got glued and assembled. The bottom panel fit into the dado and I clamped the drawer to hold it together.

I shot in some brad nails to hold it together while the glue dried.

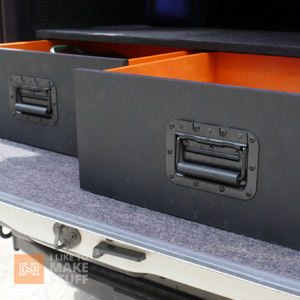
I sprayed the drawers orange and screwed on the other piece of the drawer slide. These were also flush with the bottom and front edges.

I covered the drawer slides with painters tape and sprayed the whole toolbox black.

While that dried, I cut down two more pieces of 3/4″ plywood for the top.

On the top back panel, I found the center point and marked an area for a handle cut out.

I drilled two holes with a large forstner bit, then connected them with a jigsaw.

I used a sanding drum in my drill to clean up and smooth out the handle cutout.

I cut two 3/4″ panels for the drawer fronts and marked a large rectangle in the center. This is the area to remove to accept the handles.

I used a plunge cut router to clear out the material in that area. I made several shallow passes until I got to the correct depth.

This opening didn’t need to be too exact, as the handles overlap it quite a bit.

I added a piano hinge on the back of the box to mount the top door.

I sat the box on it’s back sitting on 3/4″ scraps. This aligned it with the top panel so I could screw it to the piano hinge.

There are a few different ways to mount these hinges, but this way leaves the top fitting mostly flush with the top edge of the box.

The drawers slid right into the slides and were flush with the front edge of the box.

I sprayed the drawer fronts and screwed in the handles using a speed square to keep them square to the edges of the panels.

I added a 1/16″ spacer under the drawer fronts. Making sure the were centered, I clamped them in place to each drawer.

Each drawer front got two screws (predrilled and countersunk) from the inside of the drawer.

I cut a piece of a thick rubber mat to fit into both drawers and the back section.

These pieces will help stop things from rolling as much and cut down on noise from the contents moving around.

The top of the front section just got screwed into place.

I cut two pieces of a ribbed rubber mat to fit onto each of the top areas. The mat wasn’t wide enough to cover both so I trimmed a piece for each panel.

I put some construction adhesive along the outside edge (and randomly across) of each panel.

I lined the panels up and pressed them into place. After the adhesive was beginning to grab the rubber mat I trimmed off the overhang with a sharp knife.

I used an X-acto knife to cut out the are for the handle.

A little black spray paint covered up the exposed adhesive in the cut out.

Originally I was going to add Velcro to the bottom of the box to hold it in place, but due to the weight and friction of wood/carpet, it stays in place really well on it’s own.

I loaded up the drawers with some straps and basic tools.

The back section will probably be for larger items when necessary. I’m sure my use of it will change over time.

The post How to make a toolbox for a Land Cruiser (or any SUV) appeared first on I Like to Make Stuff.
SOURCE: I Like to Make Stuff – Read entire story here.