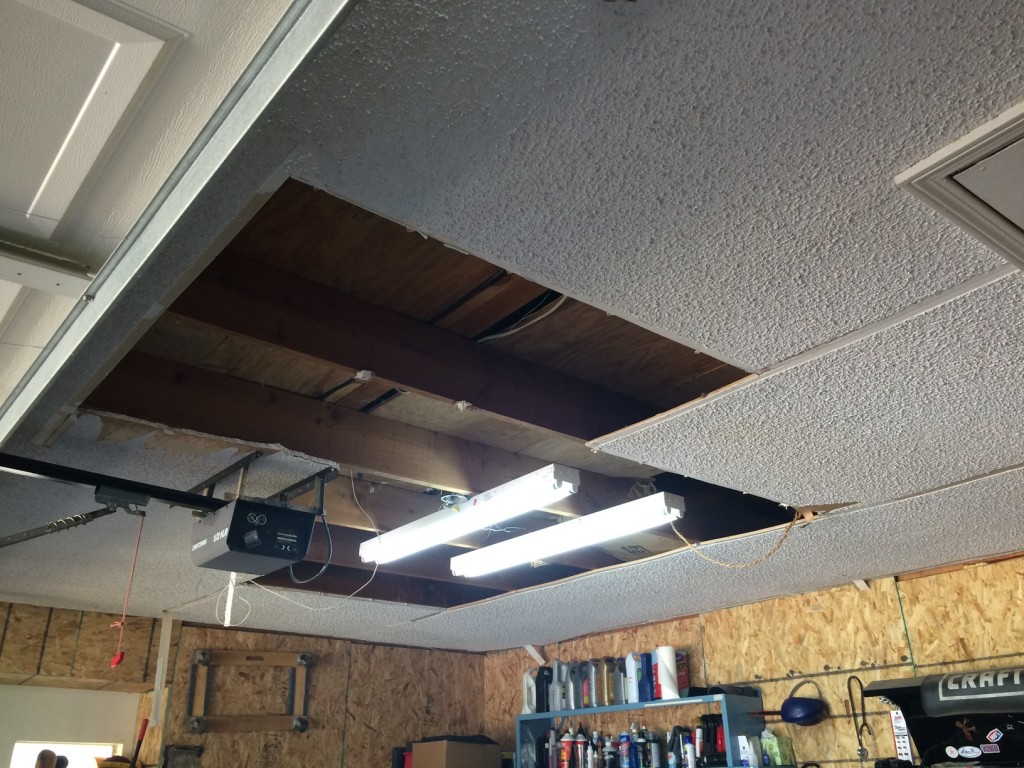
This week Cody and I fixed a giant hole we had in the garage ceiling. The ceiling in my husband’s garage was beginning to fall apart. The previous owner of the house put a couple of light fixtures on the ceiling drywall and did not attach them to the rafters. This caused some the drywall to begin to sag and ultimately fall from the ceiling one afternoon (thankfully his Corvette was not in there at the time….eeek!). Now we could have just throw a few new sheets of drywall up but a few months ago. I tore down all the drywall on his garage walls and installed OSB instead (video here). Cody has been really happy with it so since we already have to work on the ceiling, I talked him into replacing all the old sheetrock with OSB here as well. An added advantage of having OSB on the ceiling is the ability to secure a variety of light weight things to the ceiling without the hassle of locating a rafter, and this is awesome if you use the space as a shop/work area.
Things I used for this project.

We began this job by first locating the breaker which controls the overhead lighting and turning it off so that we could remove the light fixtures and garage door opener, which were in the way. After the light fixtures were removed, we began pulling down the drywall. This job creates a tremendous amount of dust so I would recommend moving out or covering up what you can. I personally found it quickest and easiest to just pull a section down and let it fall/crash to the ground and break. We did try and remove a sheet together to see if it was easier but it ended up breaking anyways and creating the same amount of mess.

Tip: I also placed the truck in the driveway so I could tear down a section, then load it in into the back of the truck to be hauled off to the dump.

Once all the old drywall was removed, I went through and removed all the drywall nails left behind in the rafters. Every….single….one needs to be removed before installing whatever material you are going to be replacing it with. This is a super tedious part but there is no getting around it. If my nieces and nephews were in town this is where I would bribe them into helping me out! Haha.
Once we got to the halfway point of the ceiling we needed to remove the overhead garage door opener along with the two track supports which are bolted to the rafters.
The last thing we did that day was go and purchase all the new material needed. Our garage required about 15 pieces of 4’ x 8’ x 1/2” OSB and after getting the material home, we laid out all of the pieces of OSB on the driveway and in our yard so that we could apply a coat of paint to them instead of painting them after they were hung overhead. Believe me, this is a much easier route than putting the material up, spreading out construction plastic to protect the items in the garage, and then rolling on the paint overhead. It goes really quick if you just pour some paint directly on the sheets then use a roller to spread it around. (It’s water base paint so any that got on the driveway came right off).

We also went ahead and rented a drywall lift; this little device really saved us a lot of work! We were able to place a full 4 x 8 sheet of plywood onto the lift and slowly raise it into position with minimal effort. Once we were satisfied with the position of the piece, we nailed it in place with a pneumatic nail gun with 2” ring nails. You can also use screws and a drill, or hammer and nails to hang the plywood if you do not have a nailer.
When we positioned the first sheet into place we noticed that the end of the board fell in between two rafters, which isn’t what we wanted. We wanted the end of the sheets to fall in the center of a rafter so that it could be secured. Consequently we had to trim a bit of length off of the boards so that the end of each piece would fall in the middle of a rafter.

When we were installing the boards we left about 1/8″ in between each board so they have room to expand slightly. You can just eyeball it but another method that makes it easier is to hammer in a nail to act as a spacer. Once the boards are installed, you can go back through and remove the nails.

We repeated the process one row at a time. It’s a tiring process but not overly complicated. When we got to the row where the garage door track was in the way, Cody used a small ratchet strap to secure the track to the rafters. Note: You do not want to just let this track hang off the ceiling. When the strap holding it in position, we removed the bracket and continue with installing the OSB. Once we installed that sheet we replaced the bracket and removed the strap.


Finally, after we covered the entire ceiling we reinstalled some lights, the garage door opener, and cleaned up all the work surfaces. : ) Needless to say, this was a tiring project, especially since it’s summer weather in Texas now. But! It needed to be done and we were able to knock it out in three days and only spending a total of $215….$170 for OSB and $45 for two gallons of paint.
This would make a great project for anyone who wants to get more functional space out of their ceiling by having good material to nail to anywhere on the overhead, rather than just on the rafters. It probably isn’t worth the effort if your ceiling is in good condition, but if you are having to redo it for some reason then I would recommend considering OSB.
If you liked this project and want to stay up to date with what I’m building, then be sure to sign up for my email newsletter and you’ll get an email when I post something new. See you soon!
*Disclosure: Some links in this email are affiliate links meaning, I may get a commission if you make a purchase. Thanks for your support in this way!
The post Garage Ceiling Overhaul appeared first on Wilker Do's.
SOURCE: Wilker Do’s – Read entire story here.


