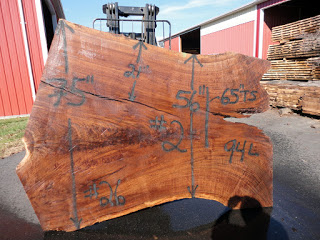
finishing up a couple of claro walnut slab projects next week. above is the slab we started with for a dining table that will go in a half round room about 10′ in diameter … the drawing is below.
typically before i actually purchase the slab, i will crop it to size in photoshop and often, can erase the dimensions with the ‘rubber stamp’ tool … that gives us and the client and idea of the final shape. in this case, i actually made a full size cardboard template for then to try in the room for a while … here’s the drawing …
and the model below, with a new base design
painted mdf base, 1″ = 1′ scale .. picture of the slab glued to the mdf top
the base only …
the base rectangles are actually welded now …
and the slab is filled and has its first coat of finish ..
the steel will have our ‘bronzy’ patina when it is finished
before the final cut to length
we use aero marine clear epoxy fill, #300/21. scroll down on the epoxy page .. we outline the cracks with a couple layers of tape and then fill to the top of the tape, which after a tiny bit of settling, allows us to
scrape it to a level filled finish.
scrape it to a level filled finish.
the second, (and there is actually a third shown briefly in this post) is a largeish coffee table,
about 46″ wide by 66 ” long by 15.5″ high .. same process ..
first a drawing with the cropped slab photo …
in this case, we made a full size painted mdf mockup to confirm the proportions ..
5/2 .. all in all done .. good to go.
it’ll be off to providence next week or the week after …
more on the ‘3rd’ project as it progresses … it is being made from slab cts#23
and it has some cracks, but also some seriously dramatic crotch figure … the first stage
of the clear fill is hardened and we are awaiting delivery of another batch on monday …
SOURCE: Dorset Custom Furniture – A Woodworkers Photo Journal – Read entire story here.


