I needed a place to put all my 3D printers and electronic stuff, so I recently split my shop into sections and built a room in my basement for them. Today, I made it awesome. The whole intention was to keep all the dust out there and give me a clean room for the 3D printers, my electronics station, and a bunch of computer equipment. In that video, I intentionally didn’t finish the window or do much to the room besides adding lights and electrical outlets around the walls.
I didn’t want to rush the design because I wanted this room to be incredibly useful and look awesome. Specifically, I wanted it to look like it’s from Tron: Legacy. If you don’t know what Tron is, it was a movie from the 80s that took place inside a computer, pushing visual effects forward a lot. It made a huge impact on me as a kid, and the sequel took that visual awesomeness to a new level. The imagery in Tron gives me a specific feeling, and I want this room to give me the exact same feeling. Unfortunately, I couldn’t start designing yet because I needed to move in the big stuff first, just like loading a moving truck.

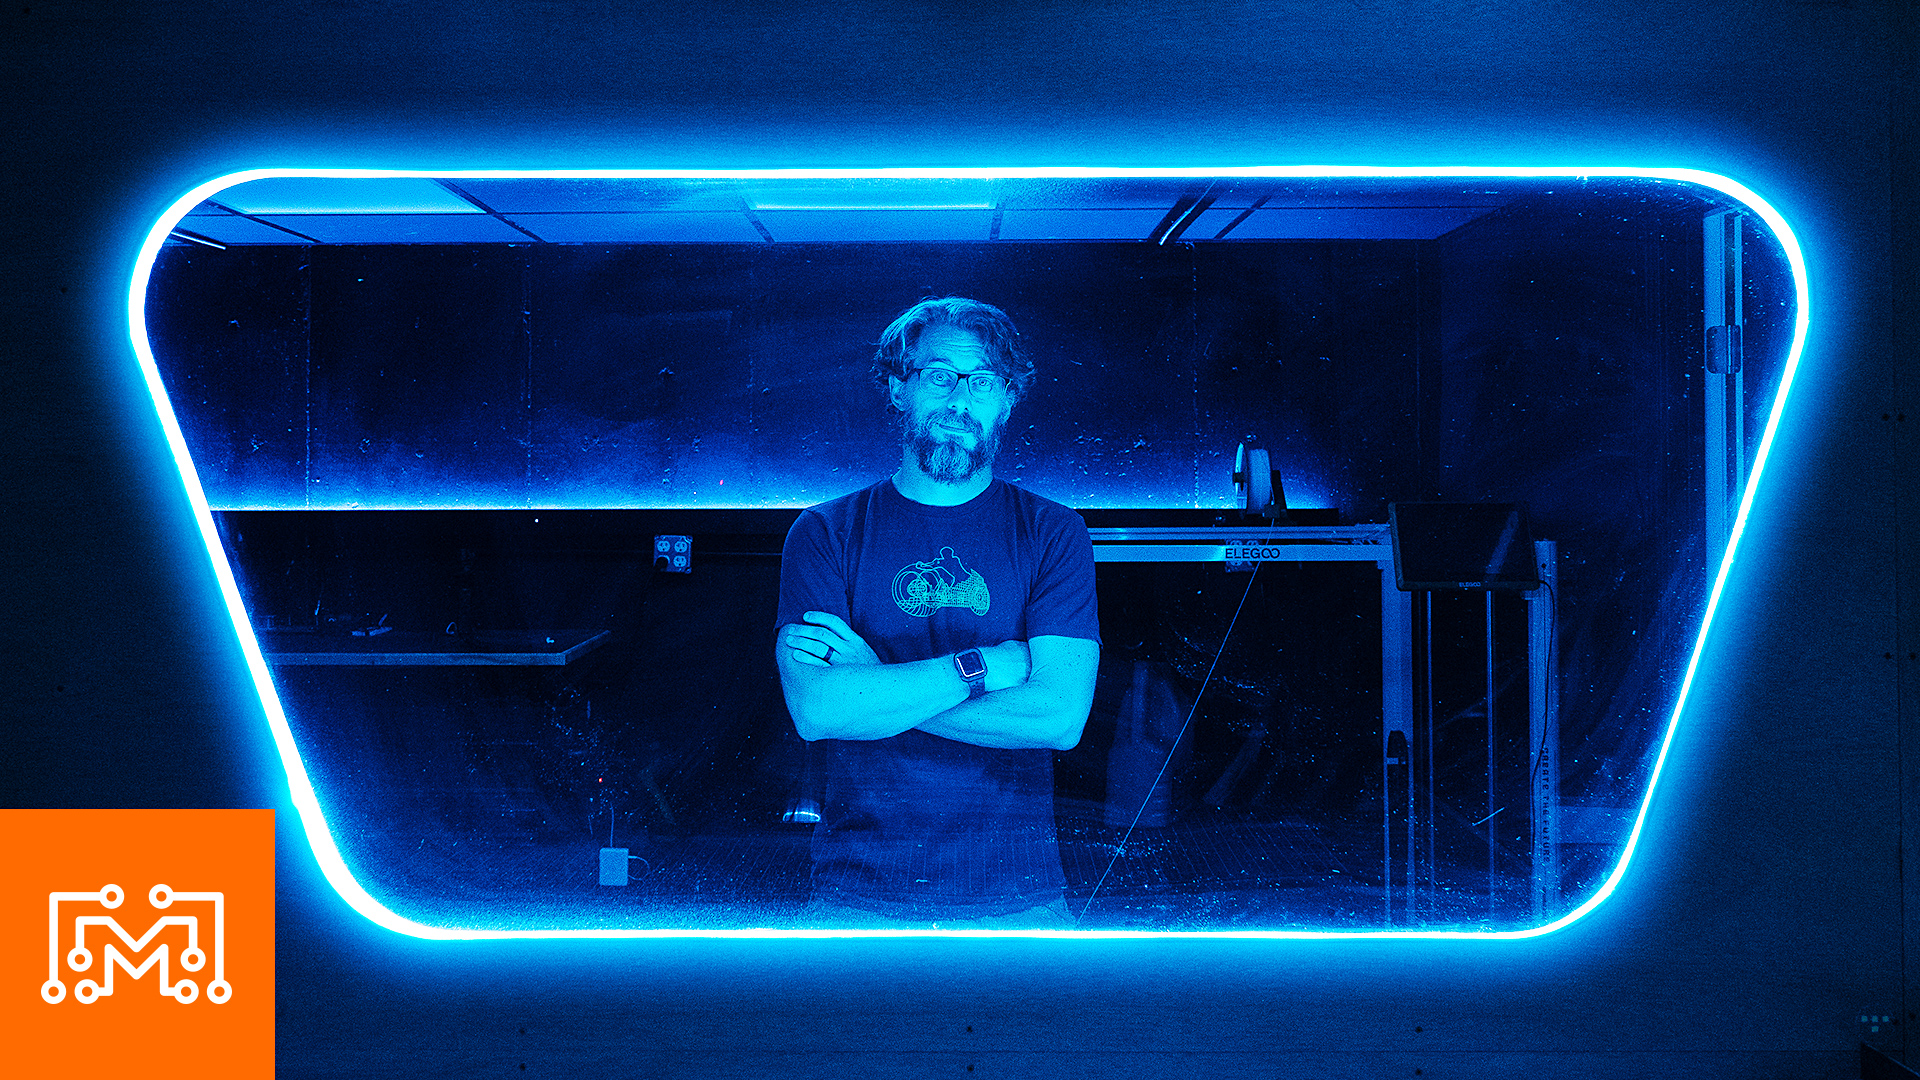
Since we’re talking about design, it’s time to look at our source material. I’m not trying to replicate any specific space in Tron; I just want the aesthetic. When you go through these art books for the movies, it’s great because you see a combination of pre-production art and stills, showing how it evolved and giving you a lot more to pull from. The feeling is what I’m trying to replicate. One thing that gives me that feeling in Tron is the luminescent edges of everything. The light bikes, weapons, and costumes have lines that emit light, something that wouldn’t happen normally but makes it look unique. Painting the room black was intentional because black rooms make all the colors pop out. So, we started with black as our canvas. I had three ideas to help this room come alive. First was the window. I wanted to uncover it and build a light system that you could see from inside and outside, carrying the coolness of the room into the shop. This idea extends to the walls, creating a long continuous shape at the top of the room to run lights across.

Next, we tackled the ceiling. My goal for the ceiling was to feel like it’s alive, with information moving around above you. I planned to have lights coming down the room and splitting off in different directions. For this, we used a lot of LED strips, but different kinds. Regular LED strips show individual LEDs if you look directly at them, so I used more of a neon LED with a diffuser in places where you can see the strip.

But the strip for the ceiling was something I’d never used before, called RGBIC, with an IC chip controlling sections of LEDs. It lights a section at a time, not individual LEDs, so I had to do some programming to try it out. I wrote code to make it look like light was being sent along a string, moving light around a coil to ensure it would work in a straight line. Then, I had to mount these strips independently of the ceiling tiles, using white corrugated plastic painted black with magnets for easy removal.

We moved on to creating ambiance in the room with a more even spread of light. For this, I used LED strips with a diffuser to make them look like neon, aiming for a morphing color spectrum moving light rather than detailed, fast-moving lights like on the ceiling. Understanding code is important to customize it to your needs, but I found a website that generates simple Arduino code for various lighting effects. I used one of these strips around the desk and loaded the code to move colors end to end, creating a cool effect behind the 3D printers. The light catching imperfections in the concrete wall shows off the texture nicely. I wanted to do the same on another wall, making a tray to hide the lights. Adding these lights made a huge difference in the room, making it look cooler. We then focused on the window, initially planning to edge-light a panel but decided on a two-layer approach using acrylic to avoid static and dust issues.

We faced challenges with LEDs being too visible, but switching to a different strip improved the look. I used an ESP module to control the LEDs and connect to the internet for status indications, like showing the internet status with different light colors. However, the ESP module caused flickering, so I switched to an Arduino Uno R4. The new setup worked well, with the window glowing blue and white, turning red if the internet was down.

This test showed we could use the window to display various indicators. I need ideas for what else to display, so let me know in the comments. Finally, to add more life to the room, I used a black light bulb to make fluorescent things glow. By moving the light through a 3D-printed mechanism, I aimed to create a moving glow effect. Modeling the mechanism in Fusion 360 allowed for quick adjustments and test prints. This setup used a stepper motor and Arduino for random movements, enhancing the room’s atmosphere.

The addition of fluorescent markers highlighted details that glow under UV light, creating a dynamic visual effect. I love the lights and animation in this room, making it feel purposeful and inspiring. Even with the lights off, it feels like a dedicated space for a certain type of work.

I absolutely LOVE how it turned out. It sparks the same feeling I had when watching TRON for the first time as a kid. It makes me feel like I’m IN that world. If you have ideas about customizing your own rooms to follow your own interests, I highly suggest you try! I appreciate you following along with this process. We’ve got more spaces to organize and update in the shop, so come back in a few weeks to see next stage in the transformation. Thanks for being here! Now go make something awesome.