Things have been busy for me over the last few years and I’ve been very active in the shop with regular things like organization, maintenance, and tweaks to the shop layout. The focus has also shifted towards product development, although I’m approaching the testing phase (if you’re interested in being a tester, subscribe to my blog for updates).
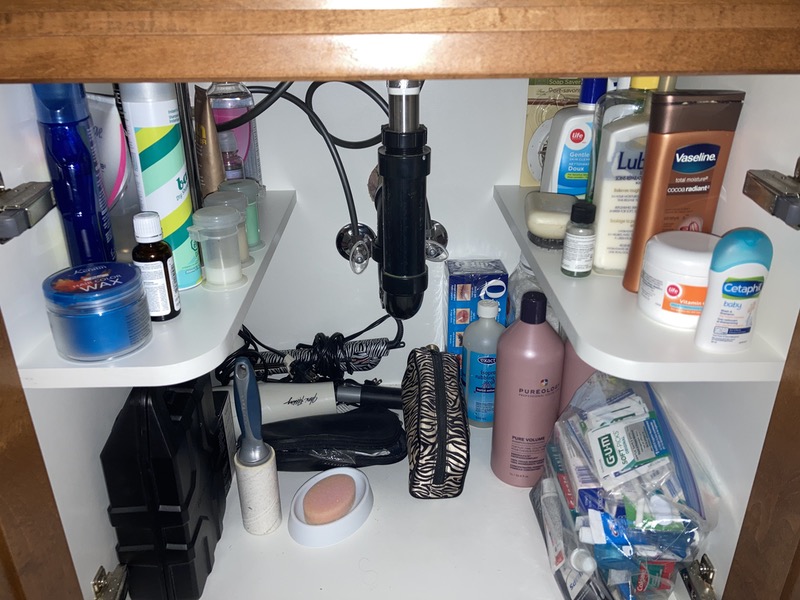
Recently, I realized a simple and quick storage project that would provide some much-needed extra space and organization in the room that often suffers the most from clutter – the bathroom. All that was required was a few scraps of melamine, some edge banding, a handful of screws, and an hour or two.
The inspiration was a cluttered counter, and realization that there was a lot of wasted space in the cabinet below the sink since it had 21 inches of height, but the items inside were much shorter. Adding a shelf was the obvious solution, but a good solution wasn’t that simple. Here’s what I considered:
- Adding a full shelf would restrict sight lines and physical access to the back of the lower level, not to mention the sink drain and water supply lines that were in the way. A large U-shaped notch in the back of the shelf could get around the plumbing. It would need to be removable to allow access for plumbing repairs;
- A shallow shelf at the front, say, 8 inches deep, would allow improved sight lines. However, that still restricted physical access, and a ledge would be required at the back to keep things from falling off the back;
- A removable tray instead of a shelf would allow convenient access to all the contents of the cabinet, but since the European hinges used for the doors don’t swing the doors clear of the cabinet, the tray would need to be either tilted to get the necessary clearance, or made narrower and a support would be required for the narrower tray;
- A shelf mounted to drawer slides would improve visual access to the bottom and physical access to the top, but the shelf would still be in the way. Also, drawer slides are expensive;
- A shelf in addition to a pull-out tray for the bottom shelf would be a good solution except for loss of usable height equal to the tray thickness plus clearance, loss of usable width due to the drawer slides (or height for under-mount slides), and cost; and
- Narrow shelves on the left and right sides of the cabinet, away from the plumbing, would provide limited storage, but allow good line of site and physical access to all items.
I decided that the last option made the most sense for my situation, so set about to make the shelves.
Once I established the size, I cut the melamine shelves to size. Then I created a template to round over the protruding corner from a piece of 1/4 inch MDF. I drew the curve with a compass, cut close to the line with a jigsaw, then finished it with a sander.
I positioned the template on each shelf, aligning it with my fingertips before clamping the template and shelf to my bench. If I were making many, I would have taken the extra time to incorporate stops in the template to automatically align it with the shelves.

Then I installed a large diameter template bit in my router and machined the corners. (Larger diameter bits tend to produce smoother cuts, and allowed to waste away the entire corner saving me the step of removing most of the waste first). To keep from cutting into the bench, I used a pair of stand-offs.

Then I used an iron and roller to apply pre-glued iron-on melamine edgebanding. I found it helpful to start in the middle and work outwards, so a slight misalignment was less likely to result in the edge not being covered at the end. I could have also taped it loosely in place to ensure alignment and worked from end to end.


To trim the edgebanding, I used my flushing plane which has been such a useful addition to the shop. The skewed blade helped ensure I didn’t push the edgebanding off the substrate as I worked.

Finally, I used a foam abrasive block to ease the edgebanded edges.

With that, the shelves were ready for installation.

I used four pocket hole screws to install the shelves – three in the side, and one in the back. Then I loaded them up. The two shelves provided room for dozens of bottles and small containers, freeing up the bottom of the cabinet for larger items. It was very rewarding and satisfying to see the level of organization afforded by this small and simple upgrade.

A final note about tolerances: most saws produce a better quality cut on one side than the other. Since these shelves would be seen from the top only (with the possible exception of the plumber), I didn’t take any precautions to reduce or eliminate chipout and instead made the cuts on my table saw with my flat top ripping blade set about 2 inches above the material. This helped ensure a chip-free top surface at the cost of more chips on the bottom.
On the other hand, a router tends to produce clean edges top and bottom. The straight flutes of the router bit I used produced flawless results on the corners, but a spiral compression bit would be even more reliable.
Compare these two pictures showing the top and bottom of the same shelf. The straight sections were cut with the table saw, and rounded corners with the router.


