
If you make custom picture frames finding Basswood that is more than 4/4 thick leaves you with few choices. Peterman Lumber here in Las Vegas sometimes carries 1 1/16″ which is S2S but usually I end up getting their 5/4 rough Basswood. The next option is 8/4 which is pricier and usually too thick for my frames. In this blog I’ll show you how I use that to make this profile. You’ll need to surface the material first. My method is using a scrub plane to flatten one face then a Powermatic planer to surface it all to a uniform thickness. This batch I was able to get to just under 1 1/8″. My goal is to select boards at Peterman which will yield the widest width when ripped in half, I was only able to get 2 7/8″ from these.

I start by setting the tablesaw blade at 15° and then adjusting a small sliding bevel to it for layout. Cut at least on extra piece of your wood about 12″ or so to do practice cuts before milling your molding. Lay out both ends of the 12″+ piece. I cut the frame members plus length for miters first, easier to run shorter pieces against the fence. This looks confusing but I’ll explain each cut as we go. I’ve added a jpeg of my own handwritten notes at the end of this blog that you can print out.
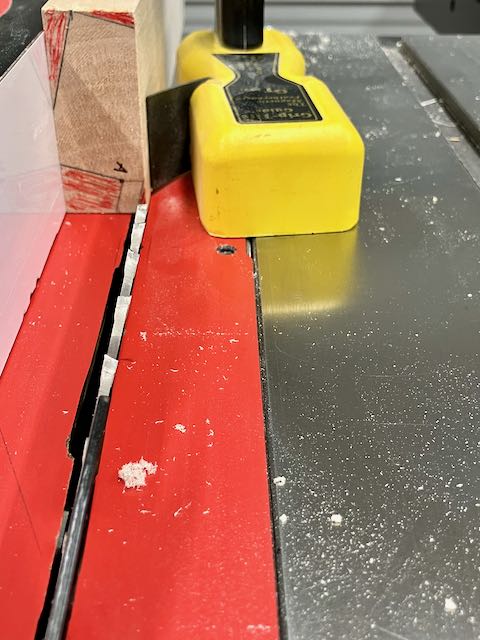
All cuts are made at 15° so leave the blade set there.


Cut #1: This creates a taper to the sight edge, measure 1/2″ from the edge and adjust fence to cut on the waste side of the line.
Cut #2: Measure down from the sight edge 1/4″ and draw a 15° line parallel to the cut edge. My rabbet depth is 5/16″ so mark that and label it A as shown. I use a saddle square and set in on point A, extend this line on to the face of the board and use that to set the depth of this cut.
Cut #3: The depth of this is determined extending a line from point A to the sight edge with the saddle square. It’ll be done with the molding flat and the back edge against the fence. This is where I suggest having another scrap or two of your material to fine tune this cut. This is why you needed to do the layout on both ends. Once you’re satisfied that the rabbet is good cut all of your frame pieces. I recommend using a feather board to your stock tight against the fence.
At this point you can do any shaping, carving or other design work on your profile. I prefer a Veritas small plow plane with a 1/4″ beading cutter but routers work just as well — just more noise and dust!
Once any details are complete it’s time for the remaining two cuts.


Cut #4: This cut gives you the angle, measure down 3/8″ to draw the 15° line using the bevel. The cut is made with the back edge on the table and the face against the fence. Again, use a feather board to keep it tight against the fence.
Cut #5: This cut is made with the face down on the table and the sight edge against the fence. You don’t need to make this cut but I do since is will give the profile a 90° edge when it’s sitting flat. I glue and clamp my frames and it can be done leaving the outside edge at an angle if you temporarily tape a cut off with a 15° angle to it so that your clamps register squarely against the frame. I’ve never used an under pinner but it work with an angled outside edge on the frame. I sneak up on this cut to take it as close as possible to my beads.

Just a note on cutting biscuit slots and also cutting the miters. Your biscuit cutter and sled must align with the angled cut on the back of the molding. This is the sled I built, the arrow indicates the beveled cut (#4), the biscuit is parallel to it. In case you’re wondering, the weight is to counterbalance the sled for long molding.
I’ve tried to make this write up as plain as possible. If you need any clarification don’t hesitate to contact me through this blog — happy to answer your questions. At the price of lumber these days buying 8/4 stock to get thick enough frame for stretched canvases. With this frame I was able to get a 1 1/8″ space for the painting. Since you’re using thinner material shipping costs are reduced too. Below are my handwritten notes.
