Now that the general outline of the frame has been carved it’s time to separate and model the leaves to give some life to it. Although I drew those separating lines in my initial steps it’s better to do them after the general outline is complete. The reason is to compensate for variations you may get as you define the outer edges. This has been discussed before but now it’s my definite method to transfer designs. It starts by gluing half of the pattern on a flexible piece of plastic (salad containers, etc.) so you have a fairly stiff piece that can be registered on the frame and drawn around. I talked about that in Part 1 of this tutorial but basically, once you find the pattern you like it’s manipulated to the size needed and printed out. I use spray glue to attach it to the plastic and then cut it out with scissors and gouges to match the curves. The next step is to use a piece of tracing paper. After tracing the plastic pattern onto the paper you draw in the leaf separations.


If you cut out the curves on the paper it’s easier to align it with the carving. To use the tracing paper you place the side you drew on first against the wood, trace over it and the lead will transfer to the frame. Flip it over and repeat the process — in essence you’re making your own piece of carbon paper. Soft lead works best for this process.

Separation and Depth
You can tell that the design is in a coved section of the frame so I was glad I had some long bent chisels in my tool chest! First up was the separations, accomplished with a 12L/#3mm V-tool. Achieving the effect of one leaf going under the other was done with the fishtail. The trickiest part of this carve was trying to scoop out the leaves to give them a realistic appearance. The two, small lobes towards the center of the frame could be done with a #9/3mm. This cut is with the grain so scooping a shallow cut from both sides then meeting in the center took care of that. The larger leaves were more of a challenge due to the concave profile and working against the grain. So, what would a tutorial be without adding a YouTube video? I’ll make the usual excuses for the quality of my video but I’m doing the best I can with the equipment I have. Hopefully you’ll glean some information from my foray into this world of carving that seems to have a limited presence on the web, guess it’s easier to program a CNC to accomplish these things; sarcasm intended!

Sanding method, not with the grain!
That’s the method I used and I think it turned out well. Sanding was another matter. I tried to make some sort of sanding block by shaping a wine cork but in the end resorted to my fingers and rotating them every which way to smooth out the wood. Most definitely not a method I’d teach students; you know you should always sand with the grain direction!

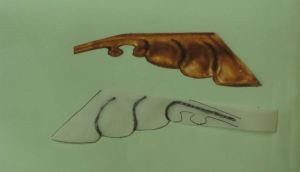
Frame Pattern
After working with the chisels and then finally sanding I was happy with the results. It may not pass inspection by a botanist but that’s not the goal! The purpose of a frame is to isolate the painting and put it in its’ own little world. The picture at the left is the inspiration I used for this design. You’ll notice that carving is on the outside perimeter of the frame whereas mine in on the interior panel — a bit trickier!
Here are the last pictures of the frame. I use a brush on burnisher/sealer for composition gold leaf rather than the traditional multiple coats of gesso and clay. After applying the slow set size the frame was gilded. I’ll wait at least 24 hours before using steel wool to knock down the brassiness of the leaf, shellac, and then tone it to give a sense of age.


For lack of a better descriptor I’m calling this Frame #85.
Tagged: burnisher/sealer, Carved Picture Frames, gilding, gouges, hand carved frame, modeling, tutorial 
![]()
SOURCE: Woodworks by John – Read entire story here.